Highlight of this article:
- Microgreen growing season
- Microgreen growing medium
- Microgreen grams to sow and containers for growing
- Microgreen watering principle
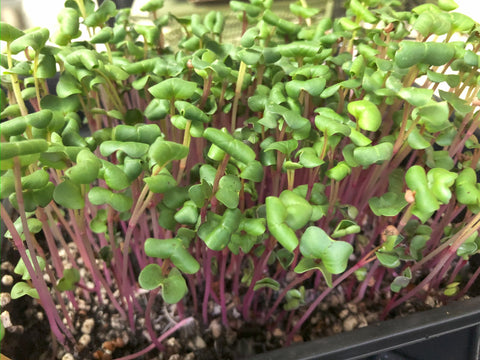
Radish No.31 is relatively easy for beginners to get their hands-on
Microgreen has been making its way to fine dining tables around the globe, not only because of its abundant nutrient and vivid colours, but also for the Farm-to-table trial experience that these delicate greens may offer simply by growing indoor.
In this series of four articles, we are going to share some growing tips of Microgreen, so you may try them out at home or office for colourful and nutritious add-on!
Professional Way to Grown Microgreen
There are increasing young entrepreneurs starting their own Microgreen business in industrial buildings in Hong Kong. Their main customers are the F&B companies, but you can also find Microgreen seedling pot or the ready-to-eat products from these startup companies. It is also worth starting from seeds and grow Microgreen yourself, especially if you are filled with curiousity of how seeds work their way big, which is great fun for gardening beginners.
Professional Microgreen growing method usually stands in hydroponic farming systems. Apart from the watering system, control of spectrum is also necessary. Since we don't eat that much of microgreen at home, we tried to come up with some method which you may grow like a pro, but occupying less space, less money. Of course, there are trade-offs of not getting harvest that is as uniform as the pro, but there you go.
Microgreen Sowing Season?
Microgreen can be harvested in 14 days, thus it is not sensitive to weather condition.
Nonetheless, the humidity and heat may affect the growth of Microgreen by bringing problems of mold. If your office is one with constant temperature, then it might be the best place to build a microgreen mini farm (also consider it a community engagement mini farm!). At home, we think that October is actually a perfect month with the weather getting cooler but most importantly, drier!
Apart from prevention of mold, another good reason for growing Microgreen in winter is that, many varieties of Microgreen can be grown into babyleaf or mature vegetables. So, after you have harvested Microgreen of Kale or Sage, you may transplant some leftover and let them continue with growing cycle.
Growing Medium?
Seeds receive nutrition from their mother plant before turning into seeds.
Thus, seeds are filled with the nutrients they need during the germination process. Water and oxygen are what activate these nutrients. Growing medium is the solid support of water to give moist to seeds. Too much water will suffocate the seed, and drying out will kill the seed too.
At Clover Nursery, we usually grow Microgreen with our own potting mix. Our potting mix is a mixture of biomix, peat moss, and perlite. These are scarce resources, so after we have harvested our Microgreens, we always return the rooted growing medium back to compost. Another more popular Microgreen growing medium is coconut coir. Coconut coir can retain water like soil, but it is lack of the organic compound consituted in biomix, so you may have to add fertilizer during the growing process. Other growing medium include hemp specifically made for Microgreen culture.
Either you are using potting mix or coconut coir, avoid soil depth over 5cm. Most Microgreen varieties do not require coverage of growing medium after seed sow, but of course with exception.
How much seeds to sow?
Growing in trays
You usually grow Microgreen in a batch, thus compared to the usual spacing calculation, the weight per area calculation matters more for Microgreen. Professional growers use the 1020 tray. At home, you can upcycle the black plastic trays that are usually 11cm*17cm (And you will need 2 for one Microgreen variety). Remember to:
- Use black or deep colour trays. You will find this useful during the next steps (Stay with us for more articles on this)
- Make some holes at the bottom of your trays, so that roots can reach out for bottom-watering
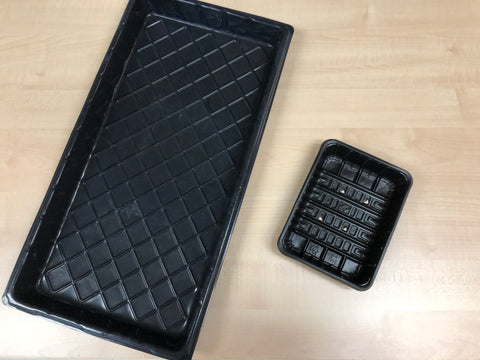
Left: 1020 Tray
Right: Upcycle trays from supermarket to grow Microgreens - and remember to make holes
There is no right answer to how much seeds you should sow.
We referenced a few Microgreen growers, and our own experiences, and came up with this table. So, if you are using a container or tray with a different size, you can calculate for yourself how much seed you need.
| Varieties | 11cm x 17cm maximum seed amount |
7.5cm Pot maximum seed amount |
Clover Seed Amount per package |
| Amaranthus No.4 | 2 g | 0.5 g | 1 g |
| Lemon Basil | 1 g | 0.3 g | 0.5 g |
| Sweet Basil | 1 g | 0.3 g | 0.5 g |
| Thai Basil | 1 g | 0.3 g | 0.5 g |
| Cress | 2 g | 0.6 g | 0.2 g |
| Kale - Kale No.1 | 2 g | 0.7 g | 1 g |
| Kale - Kalebration mix | 2 g | 0.7 g | 0.5 g |
| Mustard - Fringered | 2 g | 0.4 g | 1 g |
| Mustard - Red Giant | 2 g | 0.4 g | 1 g |
| Mizuna - Red Empire | 2 g | 0.4 g | 1 g |
| Mizuna - Red Knight | 2 g | 0.4 g | 1 g |
| Nasturtium No.1 | 2 g | 0.4 g | 5.7 g |
| Pea No.21 | 30 g | 8.9 g | 11.3 g |
| Radish - No.31 | 4 g | 0.9 g | 2 g |
| Rocket - Salad | 2 g | 0.7 g | 0.5 g |
| Sage | 3.5 g | 0.3 g | 0.5 g |
| Swiss Chard Rainbow* | 3 g | 0.9 g | 1.2 g |
| Swiss Chard Red* | 3 g | 0.9 g | 1.2 g |
| Sunflower No.1 | 10 g | 4.5 g | 5 g |
*More than 1 seedling per seed
Growing in Other Containers
Of course, you can use the old and simple way of growing Microgreen in little pots, and even biodegradable pots or egg carton boxes! You may want to ensure the containers are dry by using a hairdryer or any hot air, so to avoid mold. So how much seeds should you sow? A rough calculation would be approximately 10 seeds in a 2 square centimeter grid, but you will have to adjust the amount according to the seed size.

Microgreen Workshop: You can harvest Microgreen grown in biodegradable pots too!
Microgreen Watering Principles
Microgreen is very delicate, and this should be taken into account while considering watering. It also helps to understand that the function of upper roots and bottom roots are different —— Upper roots breath, and bottom roots absorb water.
- Germination Stage: seeds do not need excessive amount of water. Spray your Microgreens twice a day during morning and evening. The amount of water may varied according to varieties. If you are using soil, make sure that the soil surface is even to avoid standing water. Spray water until the soil is moist, but not dripping water from bottom drainage hole of your container.
- After germination: This is the stage when your Microgreen requires more water. Root structure will start to form around the growing medium, reaching out to the bottom for water source. This is the time when you are shifting into bottom-watering, and stop using spray to prevent mold.
Our next three articles will continue with more tips on Microgreen growing, stay with us on SEED BLOG!
Recommending to You:
- Autumn-Winter Clover Microgreens Set
- Potting Mix
- For Beginners:
Brassica such as Radish No.31, Kale No.1, Mustard Red Giant are easy to grow. If you are a herb lover - Sage is your choice! - For growers with more experience:
Sunflower No.1, Lemon Basil, Mustard - Fringed, Mizuna - Red Empire, Pea No.21 - For veteran growers:
Amaranthus No.4, Swiss Chard Rainbow* , Cress